
Appearance
Y401WG-L Point-to-Point Wireless Wiegand Module User Manual
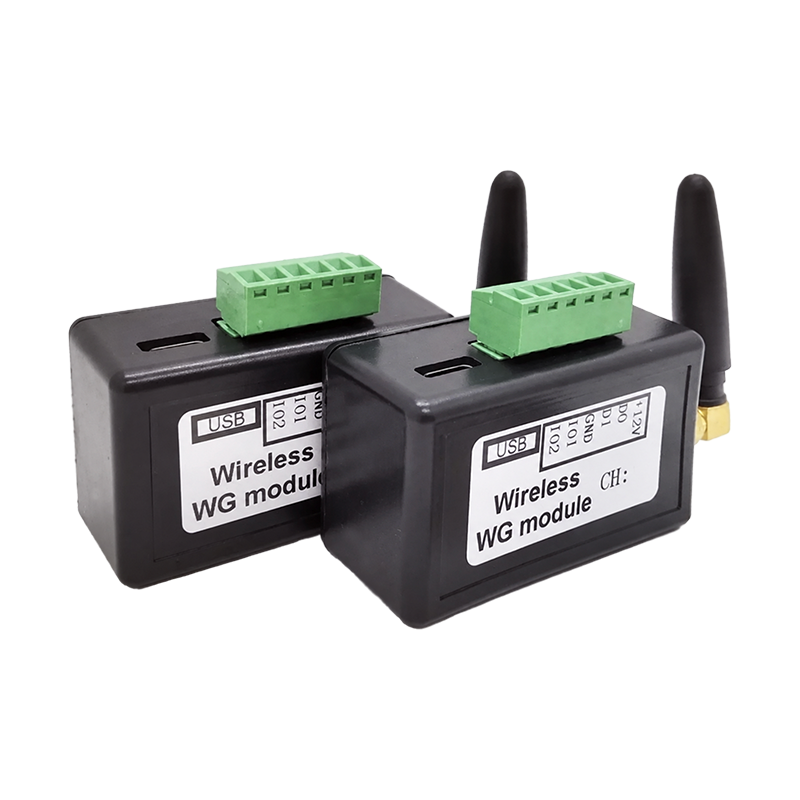
Product Introduction
Applicable model: Y401WG-L.
Y401WG-L carries Wiegand D0/D1 signals between a reader and an access-control controller over a point-to-point wireless link. A complete link uses a matched pair of modules. Optional IO1/IO2 connections carry compatible buzzer, LED, or exit-button signals.
Use the specification for Wiegand formats, radio range, electrical ratings, dimensions, and package contents.
Operating Logic
The two modules use the same hardware and automatically recognize the endpoints after correct wiring. Wiegand data travels from the reader to the controller; no Wiegand format setting is required. Both modules must use the same wireless channel. The controller makes access decisions and controls the lock.
Installation and Wiring
Before Wiring
Check D0/D1 signal levels and auxiliary-I/O electrical limits before connecting equipment whose compatibility has not been established.
Disconnect power. Prepare two modules and matching antennas, the reader/controller wiring diagrams, suitable DC supplies, and a USB-C cable with a serial tool for configuration. Check that the controller accepts the reader's Wiegand format.
Connect an antenna to each module before power-up. Install rod antennas vertically, clear of metal structures. Mount the modules indoors and test the link with doors closed and the final enclosures in place.
Reader Side

Connect the reader to the first module:
| Reader wire | Module label |
|---|---|
| +12 V | +12V |
| Wiegand D0 | D0 |
| Wiegand D1 | D1 |
| GND | GND |
This example uses an external 12 V supply shared by the reader and the module, with at least 500 mA output. Size the supply for the combined reader and module current; some readers need more than 500 mA. When sharing a supply, its voltage must suit both devices.
Controller Side
Connect the second module to the controller's Wiegand interface:
| Controller wire | Module label |
|---|---|
| Wiegand power positive | +12V |
| Wiegand D0 | D0 |
| Wiegand D1 | D1 |
| Wiegand GND | GND |
The example uses the controller's Wiegand interface to power this module. Check the available current before using that arrangement. If the controller cannot supply the module, use a suitable external supply and keep the signal reference compatible with the controller.
Optional Auxiliary I/O
The paired modules transfer auxiliary I/O signals in both directions: either end can receive an input signal for the other end to output. IO1 and IO2 require compatible signal levels, current limits, and input/output behavior at both ends. See the specification for electrical parameters.
| Auxiliary signal | Example connection |
|---|---|
| Reader buzzer | Reader BEEP to IO1 |
| Reader LED | Reader LED to IO2 |
| Exit button | Exit-button signal to IO1 |
Test each connected function during commissioning. Check electrical compatibility with YenGear before connecting an unfamiliar interface.
Pairing and Configuration
Wireless Channel
Both modules must use the same channel. Use the USB-C virtual serial port with a compatible Windows computer or Android device. The serial baud rate is adaptive.
Set a Channel
- Connect the USB-C cable to one module.
- Open a serial debugging tool.
- Select the USB virtual serial port.
- Send the following ASCII command:
text
SET CHANNEL=XXReplace XX with a supported channel number. For example, to set channel 23:
text
SET CHANNEL=23The example response is:
text
SET CHANNEL OKRepeat the process for the second module, also using channel 23.
Read the Channel
Send:
text
CONFIGAfter setting channel 23, the channel field should read CHANNEL=23. Example response:
text
HDC2012 RF-WG
CHANNEL=23
Read both modules and verify that the channel values match. When several links operate within approximately 200 m, separate nearby links by 2 to 3 channels where possible.
Firmware Updates
The module supports manufacturer-provided firmware updates through USB. Contact YenGear for the update package and procedure. Custom functions require a separate agreement on scope and availability.
Use only the firmware and update procedure supplied for the specific Y401WG-L version. Do not disconnect power during an update. Record the current channel configuration before applying a firmware update.
Commissioning
Bench Test
- Check D0/D1 assignments, local signal grounds, the 9–24 V DC supply, and available supply current. Confirm both antennas are attached.
- Power both modules and the reader/controller, and verify that their wireless channels match.
- Present a card or use the connected keypad or biometric reader. Check that the controller receives the expected Wiegand event.
- Test buzzer, LED, and exit-button behavior if those auxiliary functions are connected.
Site Test
- Install both antennas in their planned positions.
- Test valid and invalid credentials, controller feedback, and exit-button operation with the door closed and final cable routing in place.
- Check every required operating point and record any unreliable locations. Reposition antennas and repeat the test where needed.
Troubleshooting
| Symptom | Likely cause | Action |
|---|---|---|
| Controller receives no card data | Modules use different channels | Send CONFIG to both modules and set the same channel |
| Controller receives no card data | D0/D1 wiring error | Check D0, D1, and GND at both ends |
| Module does not start | Supply voltage or current is insufficient | Check the 9 to 24 V DC supply and the controller-side power capacity |
| Link works on the bench but fails on site | Obstructions, metal, interference, or poor antenna position | Reposition the antenna, use the external antenna option, and repeat the site test |
| Reader works but feedback does not | IO1/IO2 wiring or logic mismatch | Check the reader feedback wiring and verify the I/O electrical requirements |
| Several nearby links interfere | Channels are too close | Separate channel assignments by 2 to 3 channels where possible |
| USB configuration tool cannot find the module | USB driver, cable, or virtual COM-port issue | Try another cable or port, make sure the virtual serial port appears, and reopen the serial tool |
Safety Notes
- Keep a local exit and safety-release path where the access-control design requires one. Do not use the wireless link as the only life-safety path.
- Install indoors, away from rain, condensation, and washdown.
- Use a supply that meets both devices' ratings when the module shares reader or controller power.
- Check the applicable radio requirements for the target country or region before deployment.
- Manufacturer: Hunan YenGear Tech Co., Ltd.
- Email: hi@yengear.com
- Website: www.yengear.com